The Communal Realm
Community and welcome are at the heart of Transfiguration. In our worship which nourishes us, our formation and educational opportunities which shape and strengthen us, and our outreach ministries which take us into the world to do the work we have been given to do, we strive to empower our whole community. Realm, our internal communication tool enables our ministries to communicate and schedule activities.
As a member of our church family you have access to a directory of fellow members, the ability to give, opportunities to serve. This page is provided to assist members of our congregation in their use of Realm.
Getting Started
The Basics
Not a problem! If you cannot remember the password you created, click the Forgot your password? option on the sign-in screen. Realm will email you a password reset link so you can create a new password and sign-in. If that does not work for you because your email address has changed, contact the Church Office for help.
- Tap the More menu (…) in the lower right of the app window.
- Tap your picture or the circle with your initial in it if you don't have a picture posted. This will be in the upper portion of the app window.
- Tap My Profile
- Tap each item of information you wish to update. Make the necessary changes. Tap Save in the upper right corner to finish.
On your computer web browser:
- Click your name/photo in the upper right corner of the Realm web page.
- Click My Account.
- Click Edit Profile.
- Click the Contact Information or the Personal Information options at the top
- Make the necessary changes.
- Click Save to finish.
We urge everyone to add a photo to your profile so others can see it in the Directory. It helps everyone recognize and get to know one another.
On a mobile device using the app:
- Tap the More menu (…) in the lower right of the app window.
- Tap your picture or the circle with your initial in it if you don't have a picture posted. This will be in the upper portion of the app window.
- Tap My Profile
- Tap the photo (or the circle with your initials if you don't have a photo).
- Tap New Profile Photo.
You will be given the opportunity to take a photo with your mobile device or select one from your photo library.
On your computer web browser:
- Click your name/photo in the upper right corner of the Realm web page.
- Click My Account.
- Click Edit Profile.
- Click the square containing your photo (or if you have never added a photo it will display your initials).
- Add a photo or click the pencil icon to select a new photo from your photo library on your computer.
- Click Save to finish.
We urge everyone to add a photo to your profile so others can see it in the Directory. It helps everyone recognize and get to know one another.
The Church's Directory is one of Realm's most popular features. The directory allows you to browser or to search for someone. The quickest way to find someone whose name you know is to use the search function. If you are using the app on a mobile device, look for the magnifying glass icon and enter the person's first or last name. Realm will give you a list of everyone who matches what your entered.
One a desktop or laptop, look for the magnifying glass and the field to it's left. Type in the name and then chose the person from the list.
You can also access the Directory from the main menu. On a computer it will be on the left side with the other main menu options. In the Realm Connect app on a mobile device you will need to tap the More menu shown with three dots (…) on the bottom right of the app. Then tap Directory from the list.
Whenever someone posts a message, photo, or event to a group you are a member of, Realm will notify you. You control how you are notified, however. If you have set your preferences so that you receive email notifications, you will get an email at your personal email account. This is only a notification, not a regular email to which you can reply.
Near the bottom of the notification, you will see a message "View and comment on this post on Realm Connect." That is a clickable link which will launch Realm and allow you to post your reply to the group. You can also go into Realm and see the post in the Group's newsfeed where you can respond to it.
Think of it as you would a notification about a Facebook post–to see the post and reply to it, you must go into Facebook.
You can easily control what notifications you receive and their frequency. You may do this in the Notifications area of your Account.
On a Computer Web Browser
- Click your Profile Initial in the upper right corner of the Realm Window.

- Click the Notifications option.

- Make the selections you desire.

You can easily control what notifications you receive and their frequency. You may do this in the Notifications area of your Account.
On an iPhone or iPad using the Connect App
- Click your More menu in the lower right corner of the app.

- Click the circle with your profile initials or photo.

- Click the Notification Settings menu option.

- Here you can turn on the Daily Digest function which allows you to receive one email a day containing all your notifications instead of individual notification emails. You can also click each of your groups to expand the notification options available there.

- Once your have expanded a group's options you can set them as you wish.

You can easily control what notifications you receive and their frequency. You may do this in the Notifications area of your Account.
On an Android device using the Connect App
- Click menu icon in the upper left corner of the app.

- Click the Settings menu option.

- Here you can turn on the Daily Digest function which allows you to receive one email a day containing all your notifications instead of individual notification emails. You can also click each of your groups to expand the notification options available there and make the settings you desire.

- Once you have expanded a group's options you can set them as you wish.

Pledging & Giving
 Log in to your church's Realm site.

- To update or delete a payment type, click
and select Edit Account or Delete Account. Complete the fields.
Note: If you have scheduled payments assigned to this card or account, you cannot delete it until you reassign or cancel your upcoming payments. If this is the case, a pop-up window will guide you through the process.
From February 1st to April 30th, you can print a copy of your giving statement. This statement does not include nondeductible gifts.
- Log in to your church's Realm site.
- Click Giving in the main menu.
- Click Contribution Statement for the current year.
- Click Print.A preview of your statement displays.
- Click the printer icon for a physical copy or Download for a PDF.
Group Leader Help
Even though Realm is a community designed for member of our congregation, we want to welcome those who find joy and fulfillment participating in our various ministries and are not a member. We have created a special level of access for those individuals. They will be able to fully participate in your group's activities, news, and communicate with members of your group. They will not have access to the parish wide member directory or be able to see personal details of group members.
To set up access for them, please send the following information to Gabby Guion who will send them an invitation to set up their Realm login:
- Full Name
- Email address
- Phone Number
- Date of Birth (required incase a password reset is needed)
- Name of the ministry
- A brief description of why they need access.
Anyone with Realm access can request to join your group through Realm by searching for the group and clicking the Join button on the group's Info page. You will receive a notification that someone wishes to join and you can then approve them to be a member by clicking the approve button.
You can also add them yourself to your group. Managing your group participants is a function best done from the browser version of Realm since many of them functions are not available in the Connect App on your phone. Only add someone to your group as a participant if they have requested to join your group.
In the browser version:
- Go to your group
- Click PARTICIPANTS

- Click MANAGE PARTICIPANTS
- Click ADD PERSON

- Type their last name in the SEARCH PROFILES… box and select their name when it appears.

- That's all there is to it. When you add a member to your group, they will receive a notification that you have added them.
Once a person joins a group or is added by you, they are not able to remove themselves from the group. Only the Group Leader can remove a participant.
Managing your group participants is a function best done from the browser version of Realm since many of them functions are not available in the Connect App on your phone. To remove a participant follow these steps:
In the browser version:
- Go to your group
- Click PARTICIPANTS
- Click MANAGE PARTICIPANTS
- The list of all your participants will be displayed. In the list to the far right of the person's listing you will see three dots (…).

- Click the three dots to display the menu and click REMOVE FROM GROUP.
There are 4 ways to communicate with members of your group:
Send a Message: This will send an email message to each selected person. It is best used for individual messages rather than for news intended for the whole group. These messages never appear in the Group's Newsfeed where people are notified of important information.
Create A Post: This is the best way to share information with your whole group. The content of the Post will appear in your Group's Newsfeed and people will receive a notification of this post based upon their communication preferences such as an email notification. If you have turned on Allow Comments when you create the post, people can respond to the post and everyone will see the responses.
Create a Photo Post: This is an easy way for you to share photos with group members.
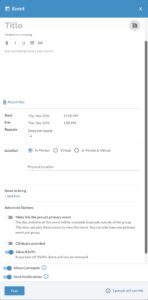
Create an Event: This is similar to a Post but it is specifically used for an event on a specific date and time. You can include items you wish people to bring and they can sign-up for them. These events will only be visible to member of your Group. They are different from the registration events that are shared church-wide.
As the group leader you determine if members of your group can also post these same communication items in your Group settings. Best practice is to allow everyone to Create Posts and Photo Posts, but to limit events to the Leader of the group.
Create an Event: This is similar to a Post but it is specifically used for an event on a specific date and time. You can include items you wish people to bring and they can sign-up for them. Instead of items, you may choose to list timeframes people may select. Be creative! These events will only be visible to member of your Group. They are different from the registration events that are shared church-wide and there is not a way to charge for these group events. For that you will need assistance from Church Staff.
Steps:
- Click the SEND COMMUNICATION option on your Group Page
- Click CREATE AN EVENT under the Post to Newsfeed section of the Send Communication Window
- Fill out the Event form. Note: The form is self explanatory however you may need to click items in blue such as the Attach Files option or the Add Item option if you wish to add those. To view the Advanced Options you will need to click the Advanced Options title. By default the event will send notifications to your group members and allow them to add comments. You may disable these if you wish. Click to view a sample of the form.
You must have been given special sign-in rights to do this. Contact the church office if you have not been given this level of access.
- You MUST use the browser version of Realm (not the mobile app version) to access event participation information.
- Watch this video for a quick walk through of the steps. VIEW VIDEO
Steps:
- Sign-in to the browser version of Realm (https://onrealm.org).
- In the upper left corner of the Realm browser window select REALM (CONNECT is what you should select to do your personal Realm activities).
- Select REGISTRATION EVENTS > UPCOMING and locate your event.
- Click the event title to display its details.
- Click the REGISRANTS tab.
- You will see a list of registered participants.
- You can communicate with the registrants by selecting the ones you wish to communicate with by placing a checkmark next to their name and choosing SEND EMAIL from the bult action menu. See the attached video for steps.